")
")
")
1.4. Laser mainboard with DIP switches - ArtNET control
How to control the Laser via ArtNET
The laser system can easily be used with ArtNET for convenient laser control via conventional lighting desks / DMX controller or lighting software. The ArtNET operation provides powerful features and allows for astonishing effects, especially if multiple devices are used.
There are two main options for ArtNET/DMX control of the laser:
A: Direct ArtNET control of the laser mainboard
B: ArtNET control of the laser software
Each option has Pros and Cons, so the choice of the correct option is crucial to achieve the best possible result.
There are two main options for ArtNET/DMX control of the laser:
A: Direct ArtNET control of the laser mainboard
B: ArtNET control of the laser software
Each option has Pros and Cons, so the choice of the correct option is crucial to achieve the best possible result.
A: Direct ArtNET control of the laser mainboard
Direct ArtNET control makes sense for any type of beam-show or aerial effects. It is especially a mighty and powerful control option if more than 5-6 lasers are in use, as effects generators of the ArtNET controller / ArtNET software then can be used to create astonishing effects.
Custom content (ILDA files) can be stored to the mainboard's internal memory and can then be triggered via ArtNET. Even though the Laser mainboard already comes with a large set of preset frames and animations, it is possible to completely customize all the content. The frames and animations are comparable to "Gobos", like in conventional lighting, but these "Gobos" in lasers can not only be static, but be animated, colorful and easily customizable. The Laser system comes with a free, full feature software that allows for creation of custom content, which then can be loaded to the Laser's memory.
Custom content (ILDA files) can be stored to the mainboard's internal memory and can then be triggered via ArtNET. Even though the Laser mainboard already comes with a large set of preset frames and animations, it is possible to completely customize all the content. The frames and animations are comparable to "Gobos", like in conventional lighting, but these "Gobos" in lasers can not only be static, but be animated, colorful and easily customizable. The Laser system comes with a free, full feature software that allows for creation of custom content, which then can be loaded to the Laser's memory.
1. Connection schematics - how to wire the Network cables
ArtNET control allows for triggering the internal intelligence inside the Laser mainboard. There is always one signal "sender" in one ArtNET "universe" and several signal "recipients".
The intelligent ShowNET Laser mainboard can be both - a ArtNET signal sender or a ArtNET signal receiver. In most cases the Laser shall just be triggered with a normal lighting desk / lighting software, so the lighting desk is the signal sender and the Laser receives the control commands from the lighting desk / lighting software.
To learn more about how to use the Laser mainboard as ArtNET controller, please see this part of the manual: More Features of the ShowNET Laser Mainboard
This is the schematics for the standard ArtNET control wiring for the Laser, which is basically a network wiring. As ArtNET users usually have knowledge about how LAN works, the explanations focus on the ArtNET specific part (Check the explanation for computer control to learn more details on network control in general: Computer Control Lasers):
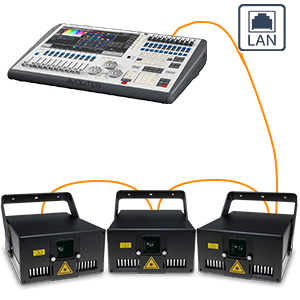
1. Use standard LAN cable to wire the ArtNET console / ArtNET control computer with the laser.
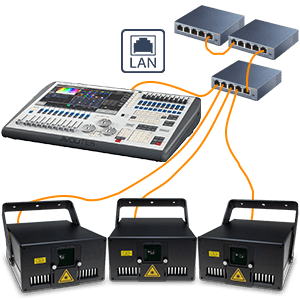
2. It is possible to use standard network switches to extend the range or distribute the signal to several lasers (some lasers have in-built network switches too).
The intelligent ShowNET Laser mainboard can be both - a ArtNET signal sender or a ArtNET signal receiver. In most cases the Laser shall just be triggered with a normal lighting desk / lighting software, so the lighting desk is the signal sender and the Laser receives the control commands from the lighting desk / lighting software.
To learn more about how to use the Laser mainboard as ArtNET controller, please see this part of the manual: More Features of the ShowNET Laser Mainboard
This is the schematics for the standard ArtNET control wiring for the Laser, which is basically a network wiring. As ArtNET users usually have knowledge about how LAN works, the explanations focus on the ArtNET specific part (Check the explanation for computer control to learn more details on network control in general: Computer Control Lasers):
1. Use standard LAN cable to wire the ArtNET console / ArtNET control computer with the laser.
2. It is possible to use standard network switches to extend the range or distribute the signal to several lasers (some lasers have in-built network switches too).
2. Switch signal input method to ArtNET
Make sure each laser is switched to "ArtNET Input" in the Admin Tool (Standard is "DMX In Port").
With switching the mode to "ArtNET" plus setting a DMX address (see below), the Laser mainboard automatically changes it's IP address assignment to the ArtNET standard, which means that the IP address range changes to 2.X.X.X and the device gets assigned a static IP address according to the ArtNET convention. That way IP address conflicts are avoided and all standard ArtNET consoles should be able to instantly find the devices in the ArtNET universe.
To be able to gain access to the laser mainboard via a "normal" IP address, simply switch back the DIP switches to Auto IP (or DHCP or anothe static IP), and it will be available again.
So only the specific combination of the ArtNET mode being set in the Admin Tool plus a set DMX address switches to the correct IP range for ArtNET control!
 Activate ArtNET operation mode with the Admin Tool
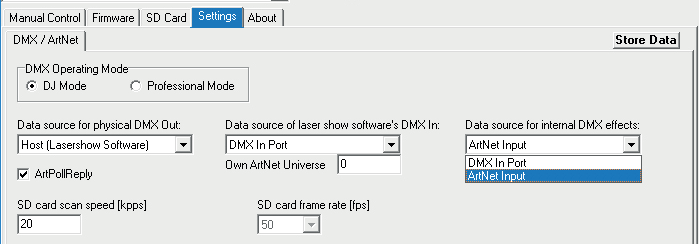
1. Open the Admin Tool and navigate to the tab "Settings".
2. Change the "Data source for internal DMX effects" to "ArtNet input" as seen in the picture below:
Here are video instructions on the Admin Tool:
3. Click on "Store Data" to save the changes.
4. Confirm the two upoming info-dialogs with click on "OK". Then restart the laser mainboard by switching the power off and back on again.
To be able to gain access to the laser mainboard via a "normal" IP address, simply switch back the DIP switches to Auto IP (or DHCP or anothe static IP), and it will be available again.
So only the specific combination of the ArtNET mode being set in the Admin Tool plus a set DMX address switches to the correct IP range for ArtNET control!
3. Set the DMX addresses for each device (that's required for ArtNET control, too)
Set the correct DMX address per Laser with the DIP switches, so it can be individually addressed via the DMX console / DMX control software. If Lasers have the same address, then they will follow the same control commands (not recommended, as individual control is not possible then).
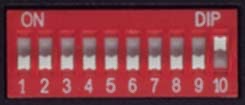

DMX addresses are decimal values, like 212, 255 or 334. But with the DIP switches it is only possible to specify binary values, so the values for the DMX address need to be calculated.
There are instructions on how to calculate binary values on the internet, but we created a handy DMX Address tool to sort this for you:
DMX Address DIP Switch Calculator (opens in new window)
Switch 10 has to be ON (up) for ArtNET mode
DMX addresses are decimal values, like 212, 255 or 334. But with the DIP switches it is only possible to specify binary values, so the values for the DMX address need to be calculated.
There are instructions on how to calculate binary values on the internet, but we created a handy DMX Address tool to sort this for you:
DMX Address DIP Switch Calculator (opens in new window)
4. Set the DMX profile for each laser - DJ Mode or Professional Mode
The ShowNET Laser mainboard is extremely powerful and provides a multitude of control options. For ArtNET/DMX operation, there are two different DMX layouts available - the DJ Mode, which is set as standard for the smaller units, and the Professional Mode. Both modes are different in the number of DMX channels and also the behavior.
Please see the specifications below:
If the ShowNET mainboard runs in DJ-Mode DMX, the DMX chart for the DJ-Mode applies:
Download DMX Chart for DJ Mode
Download DMX Chart for Professional Mode
The DMX profiles / DMX personalities / fixture profiles that are available for professional consoles, like GrandMA or Avolites, usually always refer to the Professional Mode if not stated differently.
Get DMX fixture presets / profiles / personalities (opens in new window)
The DMX operation mode can be changed by using the ShowNET Admin Tool:
Do not forget to click "Store Data" after having made changes in the settings with the Admin Tool!
These are the standard patterns, or "Gobos", that are stored in the ShowNET SD-card memory. You can customize these to your desire.
Remember: These pictures are only static, but "Gobos" with lasers can have animations and color changes added, which can obviously not be shown in plain pictures.
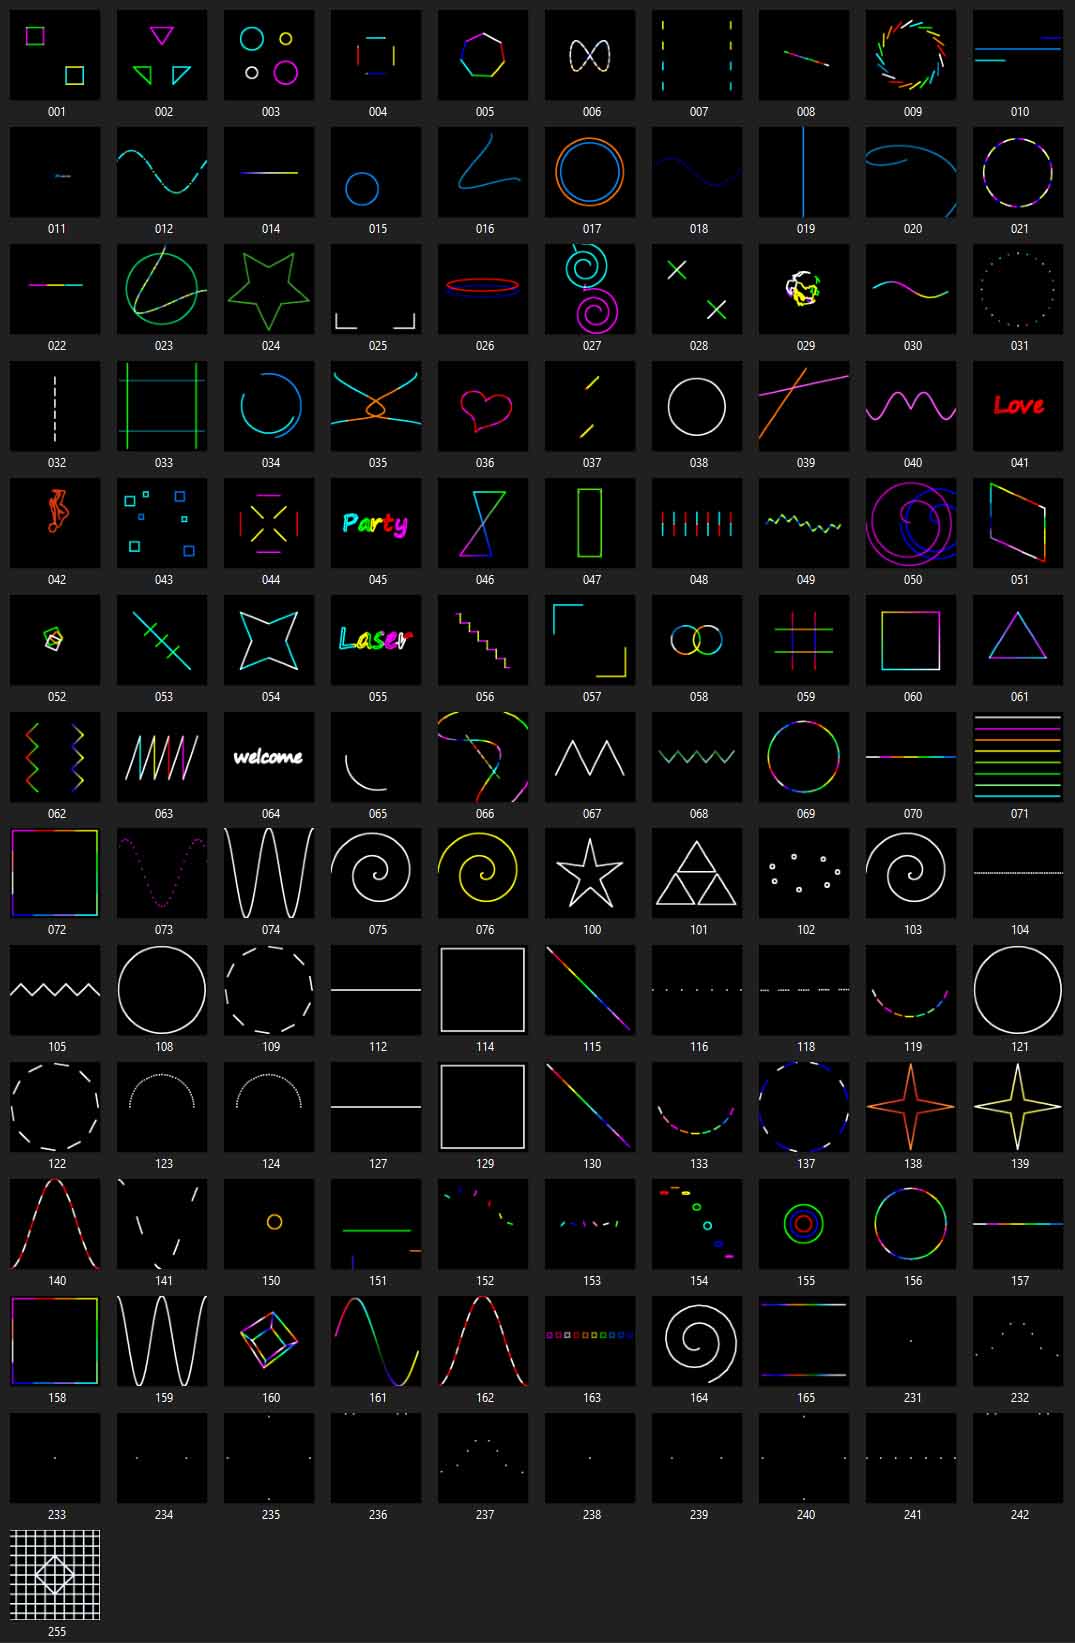
Here is the standard ILDA Fileset for download, if it needs to be restored somehow: Download Standard ShowNET ILDA FileSet
Please see the specifications below:
A. DJ-Mode DMX control - 19 channels (standard setting)
- Standard Setting for most Laser systems with ShowNET equipment
- Designed for easy control and automated effects (size, rotation, etc.)
- X- and Y-Position start centered for straightforward laser output
- Safety measures prevent too small projections
- Reduced number of channels for better compatibility with basic DMX controllers
If the ShowNET mainboard runs in DJ-Mode DMX, the DMX chart for the DJ-Mode applies:
Download DMX Chart for DJ Mode
B. Professional Mode DMX control - 34 channels (recommended for professionals)
- Advanced Setup Mode to setup the projection Zone, Safety Zone, Color Balancing and Geometric Corrections with the DMX controller without having to use any software and store these settings back to the ShowNET Laser Mainboard as globa setting. This setting is then hard-stored inside the laser, so all DMX operation happens withing this given frame.
How to activate the Setup mode:- Channel 24 must be set to a value of 134-135 AND Channel 25 must be set to value 94-95 AT THE SAME TIME - this setting must remain active during the setup programming process.
- Channel 2 can be used to select an appropriate pattern ("Gobo") for the settings - it's recommended to use a grid test pattern for this (the standard SD-card set has one on Channel 2 value 255)
- The projection of the pattern flashes, indicating that the Setup mode is active.
- Use the Channels marked in orange in the DMX chart to set the Projection Zone, the Safety Zone, the Color Balancing and the Geometric Corrections
- To store the settings made back to the Laser mainboard:
Put Channel 24 to value 204-205 AND Channel 25 to 168-169 (you have 20 seconds to do that) and leave the setting active for 5 seconds - the projection flashes three times to indicate that the settings have been stored to the Laser mainboard - After having stored the settings, zero back all your DMX values to start programming. Everything that is done with DMX (and also in automatic modes or computer control!) now happens within the framework specified in Setup mode!
For more options in Setup Mode, like reset or abort, pelase see the DMX chart. The logics is the same: The Channels 24 and 25 need to have specific values at the same time to actiavte the desired feature.
Info: The Settings made in Setup mode via the DMX controller can also be made via Admin Tool - they have the same effect! - Individual control over all features
- No zoom limitations (be careful!)
- 16bit resolution for crucial features like positioning and rotation
- Color balancing
- Individual control over color values
Download DMX Chart for Professional Mode
Get DMX fixture presets / profiles / personalities (opens in new window)
The DMX operation mode can be changed by using the ShowNET Admin Tool:
Do not forget to click "Store Data" after having made changes in the settings with the Admin Tool!
These are the standard patterns, or "Gobos", that are stored in the ShowNET SD-card memory. You can customize these to your desire.
Remember: These pictures are only static, but "Gobos" with lasers can have animations and color changes added, which can obviously not be shown in plain pictures.
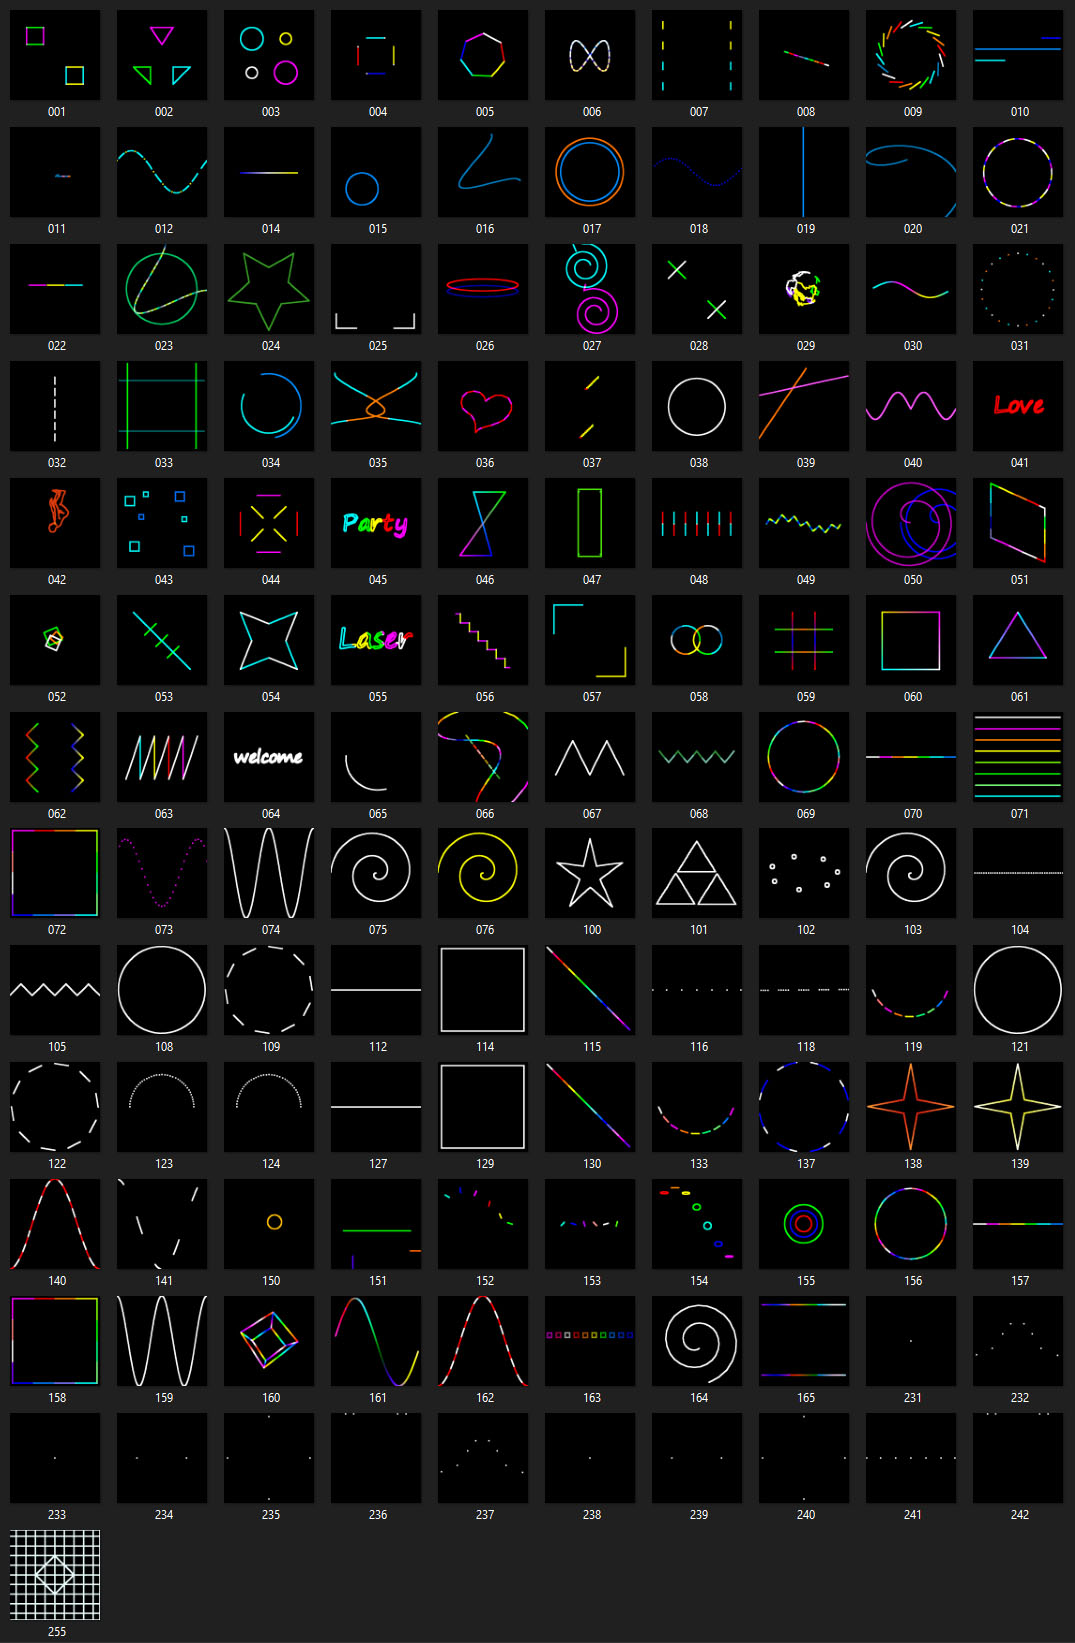
Here is the standard ILDA Fileset for download, if it needs to be restored somehow: Download Standard ShowNET ILDA FileSet
Optional: Customize the content of the internal memory, make custom "Gobos" with free software
It is very easy to create custom "Gobos" for the Laser Mainboard - they can not only be static, like with conventional lighting, but be animated and colorful.
Here are detailed instructions on how custom laser content can be created, saved and uploaded to the ShowNET Laser mainboard:
How to create and upload custom Laser content
Here are detailed instructions on how custom laser content can be created, saved and uploaded to the ShowNET Laser mainboard:
How to create and upload custom Laser content
B: ArtNET remote-control the laser software
Especially projections and graphics works require the possibility to fine-tune the output and make further quality adjustments. However, the triggering often is required to be done via ArtNET controller / ArtNET software. So to get the best out of the two worlds - laser control software and ArtNET control - it is possible to remote-cotnrol the laser software via ArtNET. That way the whole output control is handled by the laser software, whereas the trigger commands to run a certain output or apply a certain effect comes from the DMX controller / DMX software.
This is possible with pretty much all ShowNET mainboard compatible laser software, like

Showcontroller (recommended professional laser control software (www.showcontroller.com,
or Dynamics, etc.
This is possible with pretty much all ShowNET mainboard compatible laser software, like
Showcontroller (recommended professional laser control software (www.showcontroller.com,
or Dynamics, etc.
Make the appropriate settings in the software to make it listen to the ArtNET commands
The instructions on how to make these settings depend on the control software. Here is a selection of instructions:
Showcontroller:
https://www.showcontroller.com/en/manual/showcontroller-live/0-9-remote-control-the-software/0-9-b-artnet-control-the-software
Showcontroller:
https://www.showcontroller.com/en/manual/showcontroller-live/0-9-remote-control-the-software/0-9-b-artnet-control-the-software